There are many possible reasons as to why someone would go looking for a tutorial on How to create a Bootable windows XP. To start with, it maybe because you just bought your PC/Laptop off the shelf and it didn’t come with a Setup CD or that your PC is choking on every function. There is also a chance that your PC has built up mess over the years and that inturn has slowed your PC. Whatever the reason is, we are here to help.
In this post we will be guiding you with a Step-by-Step tutorial on How to create a Bootable Windows XP CD/DVD or USB Key.

Creating a Bootable Windows XP CD/DVD from Hard Disk
The instructions listed in this section will be dealing with creation of a Bootable Windows XP for off the shelf PC’s that did not come Bundled with a Setup CD.
Requirements
- A Windows XP System, this process has not been tested for any other Versions of Windows but will work for all the Editions of Windows XP.
- I386 Directory (Folder) on your Hard Disk: It is necessary to have this folder in your Root Directory even if you find it in some path other than your Root Directory like “C:\Windows\Driver Cache\i386” this process will not work for you. It is absolutely necessary that you Find it as C:\i386, where C:\ is the drive your Windows is installed.
- Windows Licence Key: This can be found taped on the back or underside of your PC . If you don’t have luck finding it there you can go unofficial and find one for your Version of XP on Crack Websites like this one
- Drivers: A driver is a software that recognizes and makes Hardware functional and before you begin creating a Bootable Disk it is recommended to get your hands on Drivers in the form of CD’s or you can download them from your manufacturer’s official website. Alternatively, you can backup all the drivers using Free Device Driver Backup and Extraction Utilities.
- CD/DVD burning software: You can use Nero or ImgBurn or any other Software that supports burning Bootable disk. For this article we have used and recommend free ImgBurn.
- Windows Setup CD Boot Sector: You will also need the boot sector of an existing bootable Windows 2000, XP or 2003 setup CDROM. The easiest way to get this is to download the file wxp10.zip from one of the links listed here.
It is also recommended to backup your whole System in case there is any technical glitch. This can be achieved by using your default Recovery Disk or alternatively you can use Free Hard Disk Backup and Restore, Hard Disk Image and Cloning Utilities for the same purpose.
Creating the Bootable Windows XP CD/DVD
Step 1: Create a temporary working folder in root of Drive (C:\) named XPSETUP
Step 2: Copy not move C:\I386 to C:\XPSETUP which will give you C:\XPSETUP\I386.
Step 3: Create an ASCII text file with absolutely the word and case “Windows ” without quotes but with an extra space at the end. You can do so using Notepad. Type the word “Windows” without the quotes then type one additional space. Finally, hit the ENTER key. Do not add anything else to this file.
Step 4: Save the file with the filename “WIN51” with the quotes in C:\XPSETUP.
Step 5: If your PC or laptop originally came with XP Home, make a copy of the file you just created and call it “WIN51IC”. If you are using XP Home Service Pack 1 (SP 1), make two copies of the file and call them “WIN51IC” and “WIN51IC.SP1”. If you are using XP Home Service Pack 2 (SP 2), make three copies of the file and call them “WIN51IC”, “WIN51IC.SP1” and “WIN51IC.SP2”. All the copies of the files should be in C:\XPSETUP.
Step 5: Now, that everything is in place open the wxp10.zip you downloaded in the requirements section. Once the zip file is open, go into the cds directory and into wxphome directory, followed by the files directory. Drag the “w2ksect.bin” file exactly into C:\ (the root directory/folder of drive C:).
Burning The Bootable Windows Install CD/DVD
Assuming that you downloaded the correct version of ImgBurn(2.3.2.0 or > V2.4.0.0) or you are well acquainted with other Burning Software you can begin the final process as:
Step 6: Copy all the Code below and paste it in Notepad, save it as “” including quotes on Desktop or anywhere you can find it.
Code:
IBB
[START_BACKUP_OPTIONS]
BuildMode=1
Destination=0
TestMode=0
Verify=1
WriteSpeed=0
Copies=0
FileSystem=1
PreserveFullPathnames=0
RecurseSubdirectories=1
IncludeHiddenFiles=1
IncludeSystemFiles=1
IncludeArchiveFilesOnly=0
AddToWriteQueueWhenDone=0
ClearArchiveAttribute=0
VolumeLabel_ISO9660=VRMHOEM_EN
VolumeLabel_Joliet=
VolumeLabel_UDF=
Identifier_System=
Identifier_VolumeSet=
Identifier_Publisher=
Identifier_Preparer=
Identifier_Application=
Dates_FolderFileType=0
Restrictions_ISO9660_InterchangeLevel=0
Restrictions_ISO9660_AllowMoreThan8DirectoryLevels=1
Restrictions_ISO9660_AllowMoreThan255CharactersInPath=1
Restrictions_ISO9660_AllowFilesWithoutExtensions=1
Restrictions_ISO9660_AllowFullASCIICharacterSet=1
Restrictions_ISO9660_DontAddVersionNumberToFiles=1
Restrictions_Joliet_InterchangeLevel=1
Restrictions_Joliet_AllowFilesWithoutExtensions=1
Restrictions_Joliet_AddVersionNumberToFiles=0
BootableDisc_MakeImageBootable=1
BootableDisc_MediaEmulationType=0
BootableDisc_BootImageFile=C:\w2ksect.bin
BootableDisc_DeveloperIdentifier=
BootableDisc_LoadSegment=07C0
BootableDisc_LoadSectorCount=4
[END_BACKUP_OPTIONS][START_BACKUP_LIST]
C:\XPSETUP
[END_BACKUP_LIST]
Step 7: Run ImgBurn, Select Mode>> Build from the menu.
Step 8: Navigate to Select File> Load Project from the menu. From the dialog box that Pops up>Select the XPSETUP.ibb file you saved earlier and click “Open”.
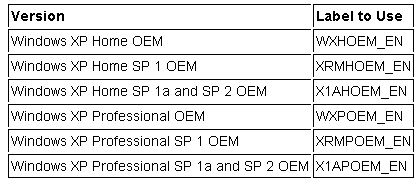
Step 9: Click the “Labels” tab on the right side of the screen. Change the label in the ISO9660 field to one of the following, depending on what type of Bootable setup CD you’re making.
Step 10: Click on Write Button which should be near the lower right corner and should pop up as an Alt Tag saying Write when you hover cursor over it.
Step 11: A pop up saying something like “You’ve only selected 1 folder! C:\XPSETUP. Does the ‘XPSETUP’ folder represent the root directory for the image content? (Otherwise the ‘XPSETUP’ folder will be visible in the root directory of the image.)” Click “Yes” to this.
Step 12: If you get an error message regarding “c:\w2ksect.bin” that means you have messed with the code. You can Go Back and fix the issue.
If everything goes fine, after the Burn has completed your Windows setup disk will be created. To use it, make sure your BIOS is set to boot first from your CD drive, and reboot, this can be reached by pressing F11 or F8 for most PC’s right when your PC has started to boot. Then place the CD into the CD drive and if all goes well, the Windows installer starts up and you’re on the way to re-installing your system.
How to Create a Bootable Windows XP USB Key
The method that we are going to list next is for PC users without a working CD/DVD writer or Notebook owners that often do not come with a CD writer. This method can be used for almost all versions and editions of Windows OS.
Requirements
- A USB Key(Drive) with 1-2 GB capacity.
- Official Windows XP CD.
- WinSetupFromUSB Software which can be downloaded here.
- A PC on which you are Creating this Bootable Key, should have both CD player as well as an USB port.
- PC compatibility to Boot from an USB Drive that can be Checked in BIOS.
- The USB Key should be fast enough to avoid delays or any errors relating to speed.
Creating the USB Key
Step 1: Download and Install WinSetupFromUSB
Step 2: Insert the official Windows XP disk into CD ROM Drive and click Browse.
Step 3: Select the CD ROM as source on the Software menu and enter destination path on the PC.
Step 4: Insert the USB Key, Hit refresh and then select it as the final destination using small arrow located just to the left of the Window.
Step 5: Select Fixed, then Click on GO and wait for the process to complete.
Installing Windows XP using Bootable USB Key
Step 6: Insert the USB Key into the port of computer you want to install Windows XP on.
Step 7: Most of the PC’s recognize F11 or F8 as a function to enter into BIOS just when the boot has started. Once you are in it, choose Boot from the USB key, save changes and Exit.
Step 8: After the restart you will see two options in GRUB menu. Select the first one that says boot from USB to start installation
Step 9: Follow instructions till installation is complete.
Step 10: Install/update the required Drivers.