Kindle and other similar devices come with a custom Android OS and that limits many features that you could use to enhance experience on your Android OS. Rooting is particularly most sorted for Kindle as in order to just be able to run it outside the US with full features demands it. You can also access and customize many intrinsic functions of your Android device by rooting it. While root for Kindle came out early using the sparkym3 method which only could be operated via Windows, it is now possible to do the same using Mac or Linux.

A senior XDA member, prokennexusa has helped a lot of Mac users to successfully root their Kindle using an easy to follow, step by step guide. In this post we will be guiding you on How To Root the Kindle Fire 7″ HD on Mac.
You might also want to checkout Best Kindle Chargers and places where your can find Free Kindle Books.
Requirements
1. Mac OS X 10.5.8 or later (32-bit and 64-bit)
2. A Free USB 2.0 or 3.0 port but you should preferably stick to a USB 2.0 port.
3. Your Kindle Fire HD 7″
Getting Started
First of, you have to Enable root user in Mac OS X as by default this is disabled. You can get specific and complete instructions on the whole process here.
It is recommended that you use the latest version of Superuser.apk and the SU binary available as a software from XDA developers. In this post we have divided Rooting your Kindle on Mac into 12 simple steps. Any deviation can brick your device, so if you doubt or don’t understand any part post a query and we will get back to you.
Step 1: While your Kindle is Unplugged from the USB port, Go-to Kindle, navigate to the pull down options bar, choose More > Security> and make sure that you Enable the ADB by tapping the ON button.
Step 2: Once again, Go to your Kindle, navigate to the pull down options bar, but this time choose More > Device and make sure you Allow Installation of Applications by clicking ON.
Step 3: Go to your Mac workstation, download and Unzip Root MANY ANDROID! There are three different sets of download Versions available for different platforms and make sure you use the correct one, matching your platform. Alternatively, you can download your Mac 64-bit Version 18.5.1 directly from Apple64.zip. Take a close note on the unzip path of this SDK package.
Step 4: Plug-in your Kindle into USB 2.0 port and wait for the drivers to install which only takes a few minutes and is automated on Mac.
Step 5: Open up a browser from your Mac and Download and install Java Platform (JDK) 7u13 . For further information on the process for your Mac navigate to Mac 64-bit JDK 7.13 Install Notes.
Step 6 : Reboot your Mac after installation is complete.
Step 7: Next thing you will have to do is open up a Terminal window which is like Command Prompt for Mac. Now you are ready for some coding in Terminal window ($ command prompt). So, to begin with, type in the below codes followed by specific instructions.
Code 1:
su –
If you are prompted to enter your Root password, enter it and you will be able to see a # at the command prompt.
Step 8: Go back to the open command prompt at the /RootPackage32or64Folder/# and enter:
Code 2:
chmod 777 RunMe.sh
sh RunMe.sh

OR

./RunMe.sh
Select Option 1, when you are prompted to select one, Run normal methods and ignore errors. While the process is initializing your Kindle will pop up a “Restore” dialogue box. Click on restore and when it is done your Kindle will reboot automatically.
Note : If you receive ‘can not execute items in the stuff folder’, please check to make sure you downloaded the correct package for your platform. The Linux 64-bit package will not work on a 32-bit computer. If you have verified your download and you are still seeing the ‘can not execute items in the stuff folder’ message, please post a screen shot here.
Step 9: Type in the code Exit and hit Enter.
Step 10: Finally go back to the Kindle, navigate to the /Apps tab, click on Device, next find and click on Superuser.apk initialize the Superuser daemon.
Step 11: Finally, using a Web Browser on your Kindle Download suchecker.apk to the /RootPackage32or64Folder/#:suchecker.apk. After the download has completed, open a command prompt at the /RootPackage32or64Folder/# enter:
Code 3:
./stuff/adb kill-server
./stuff/adb start-server
./stuff/adb devices
./stuff/adb install suchecker.apk
./stuff/adb reboot
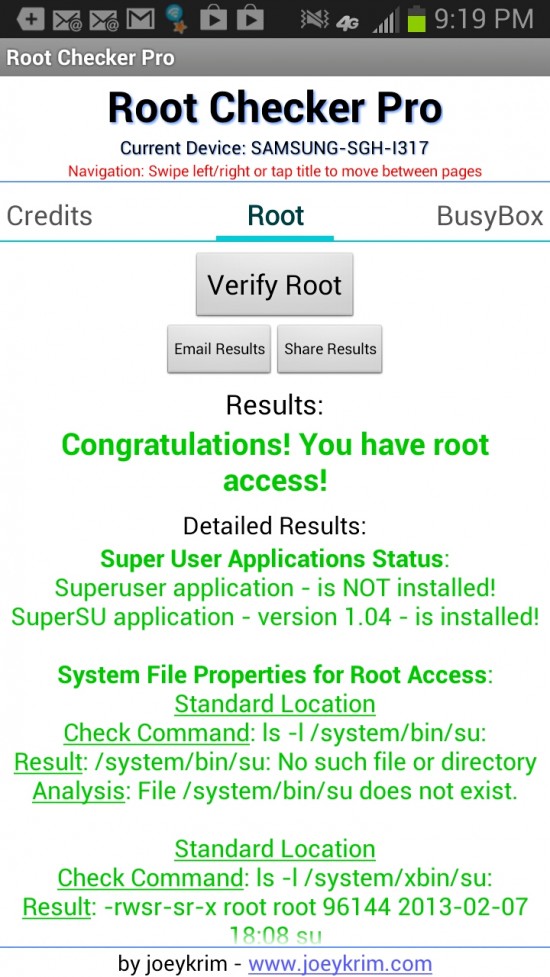
Step 12: After the installation has finished, navigate to your Apps on your Kindle. Launch Root Checker Basic. When you check Root you will be presented with a “Allow” dialog box, and make sure you allow the Root Checker. If everything goes fine you will see that Superuser.apk working. The below screen shot will give you an idea on how it should look like.

You should now be able to enjoy your rooted Kindle Fire HD and this also confirms the full functionality of your ADB communications. However, before using your Kindle as such, it is absolutely necessary to Disable Amazon OTA (Over the Air) to ensure prolonged root experience on your Amazon Kindle HD. This can be done by following instructions listed here and finally rebooting your Amazon Kindle HD.
You will find Google Play Store missing and this can be dealt with by following the step by step instructions given on How to: Install Google Play Step-by-Step Thread.