Ubuntu is a Linux based operating system which is distributed as free and open source software. A lot of companies run their PC on this operating system. It is considered to be one of the most popular Linux distributed software on personal computers.
Like the windows operating system, Ubuntu also has the facility of remote desktop mode. It is easy to configure the mode; however, before explaining the steps, it is important to have an idea of what the remote mode does.
The Use of Remote Desktop Mode:
Remote mode actually allows the PC to be operated by another PC on the same connection. Sometimes, we are involved in such a task where we may be in need of accessing details and contents of another PC where we may not be physically present. In such cases, it is the remote mode that turns out to be of help.
With the remote mode, a PC can gain total access of another PC and handle its functioning and files. There are levels of restriction that you can impose as you can limit the participation of another PC to merely watching the details and revoke the rights to make changes.
However, one can also give full rights to other PC which is generally not recommended for security purpose. Having full right means that the other PC can make changes to the system.
How to Enable The Remote Mode?
Enabling the remote mode in Ubuntu PC is very simple as merely following these instructions will help you in turning it on.
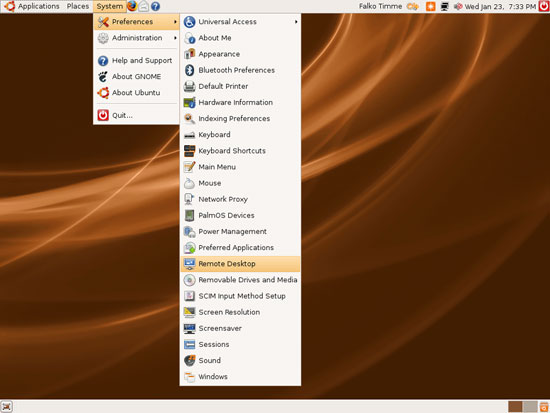
Step 1: Right on the top of the desktop screen, there is a tab called system with lots of options to choose from.
Step 2: When you move the mouse to system, a drop down list comes showing all the main categories. Select the first option preferences and another forward list drops down. In that list, choose the option Remote Desktop as shown in the below image.

Step 3: As soon you click on this option, a new dialog box would open with a lot of details and options that you can check or uncheck. The dialog box is the remote desktop preferences.
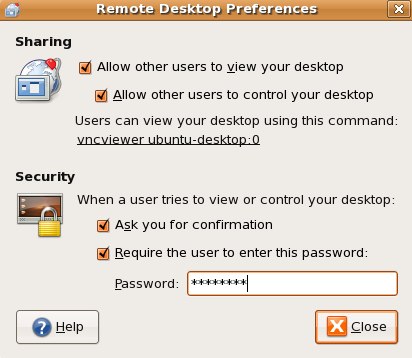

As you can see in the above screenshot, there are various options that are present in the box for “sharing” and “security”.
Step 4: In order to enable the remote desktop feature, you have to check the first two options only.
Step 5: If you want to limit the power to the computer for only viewing purpose, do not check on the option “allow other users to control your desktop”. When this box is not checked, the other connection would be able to view your desktop, but they cannot make any changes whatsoever.
Step 6: Further, for extra security reasons, you must check both the boxes in the security tab too. You should always enter a strong password and share it only with those connections to which you want to give the power to access your system.
Checking these options and setting a password ensures that whenever a new user wants to control your computer and enter the remote mode, they would be prompted to fill the password and only if they enter the right word, they would be given access. In the remote mode, a lot of changes can be made to the system and it is extremely important to control access. Hence, using a strong password and keep it changing often is the best way to keep security intact.
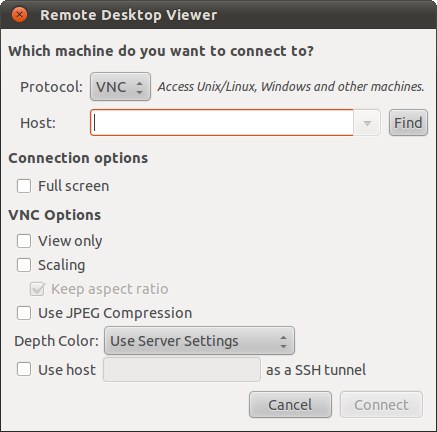
For the sake of using the remote desktop mode, you should go to applications, choose internet and then choose remote desktop viewer. In the dialog box that opens, click connect. After you have clicked on it, a new window opens where you need to enter the name of the host PC which you want to access along with details like whether you want full screen view or scaled. Select VNC options as you desire and click Connect.

These were the simple steps that can help you configure the remote desktop mode and use it on Ubuntu.